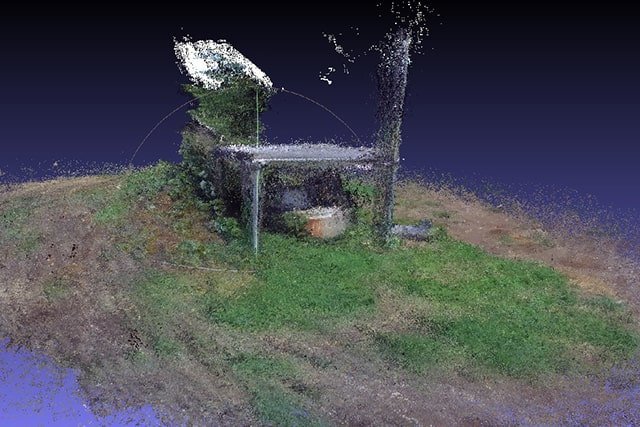
このプロジェクトではドローンにステレオカメラ(ZED)を搭載して、オブジェクトあるいは地面の一部分を3Dside-by-sideフォーマットでレコードします。後にアルゴリズムで処理し色のある3Dマップを作成します。目的はオブジェクトまたは地面一部分のサイズの計測です。
例えば今回ZEDで撮影した地面上のオブジェクトを3Dレンダリングすると、下記のような結果になります。
I. ハードウエア
-
概要
今回、ZEDはデータ取得を担当します。(ZEDは可視光のため、使用可能な環境であるかどうか検討する必要があります。)
Nvidia TX2は3D処理のために使用し、地上のノートブックからSSHとwifiを使ってコントロールします。使用するドローンはMatrice100です。
-
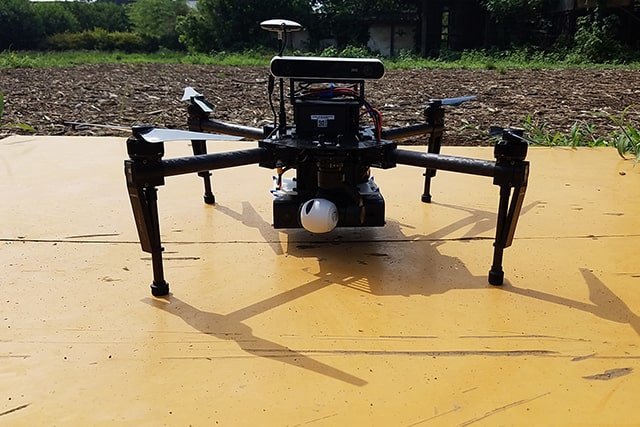
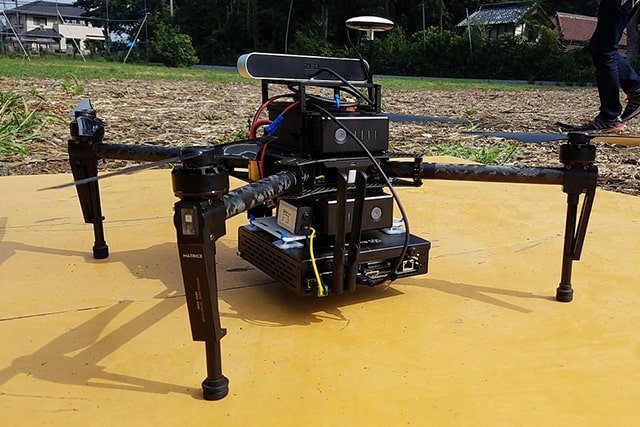
ドローンにZEDとTX2を搭載
ZEDとTX2をドローンに結合するため、3Dプリンターでプラスチックのパーツを作成しました。より広範囲を捉えるため、ZEDはドローン本体のできる限り上に搭載します。
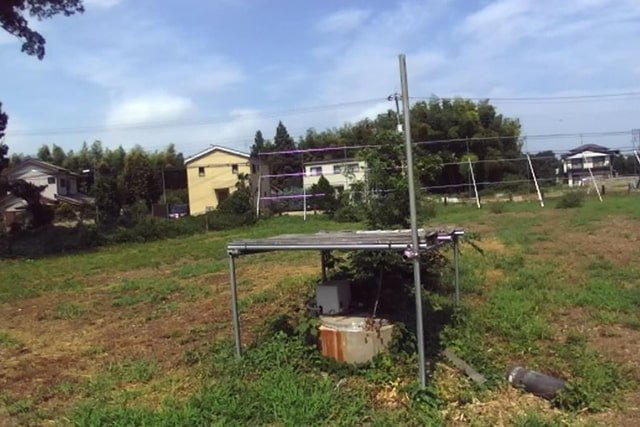
ZEDを搭載したドローンによる対象物撮影
実際に上記のハードウェア構成でZedを搭載したドローンで撮影を行いました。この撮影による計測結果は後述します。
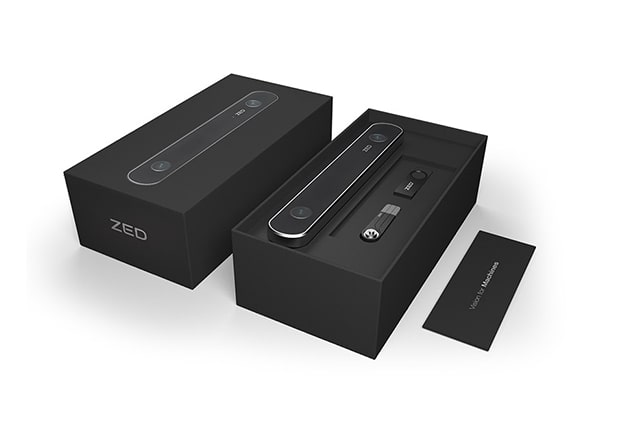 (出典)ZED Stereo Camera
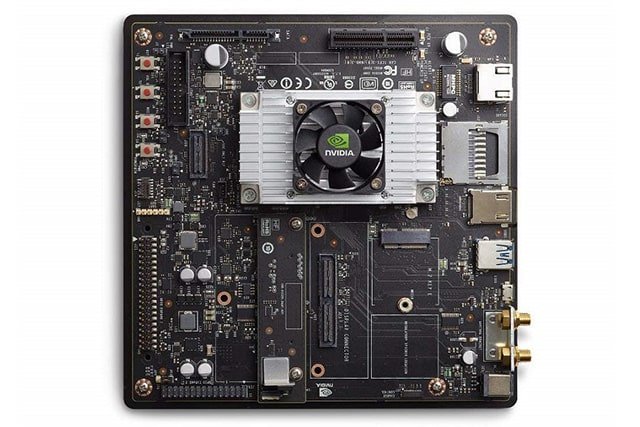 (出典)Nvidia TX2
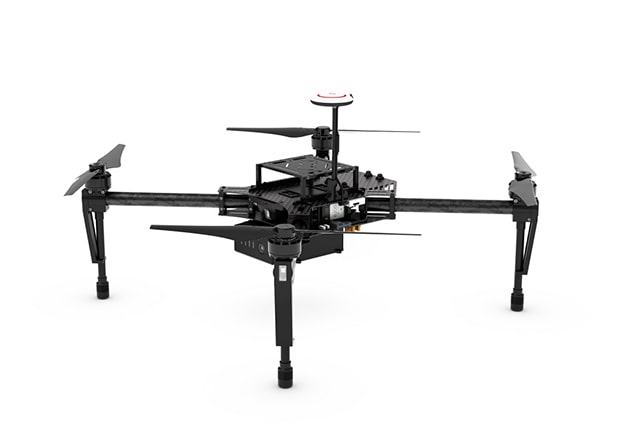 (出典)Matrice 100|DJI
II. インストール
-
JetPack
Nvidia TX2のJetPackはUbuntuを標準OSとしており、OpenCVやNvidiaCudaなど必要なライブラリも含まれています。
Nvidia TX2にはWifiモジュールが搭載されているのでWifiとSSHを使って接続することができます。 -
ZED SDK
StereolabsがZedを使用するためのSDKを提供しています。こちらのSDKをJetpackにインストールする必要があります。
-
ROS(Robot Operating System)
ZED取得したデータの送信には、Ubuntuのバージョンに合わせたROS(kinetic)を用います。
JetpackにROSをインストールします:
sudo apt-get install ros-kinetic-desktop-full次に、必要なライブラリをインストールします:
sudo apt-get install libpcl-dev libpcl1.7 libpcl1-dev python-pcl-msgs sudo apt-get install libusb-1.0-0 libusb-dev libusb-1.0-0-dev sudo apt-get install libexif-dev python-opencv sudo apt-get install ros-kinetic-cv-bridge ros-kinetic-cv-camera -
ZED ROS Wrapper
ROSはZEDに接続するために必要な、Stereolabs提供の「Zed ROS Wrapper」 ライブラリを搭載しています。
-
rtabmap
3Dマップを作成するにはSLAM(Simultaneous Localization and Mapping)が必要です。SLAMは自己位置推定と地図生成を同時に行う技術で、現実空間の奥行きを把握し3Dマップをビルドします。
SLAMの中で、今回はオープンソースのソフトウェアであるRTAB-Map(Real-Time Appearance-Based Mapping)を使います。 -
PCL(Point Cloud Library)
3Dマップの表示と計算のため、「Point Cloud Library」を使います。
-
QTライブラリ
操作しやすいインタフェースをつくるため、QTライブラリを使います。QTライブラリはGUIアプリケーション作成用フレームワークです。
III. 実行
-
1. ZEDを起動
ZEDが取得したデータをROSに送信するため「Zed ROS Wrapper」を起動します。
roslaunch zed_wrapper zed_camera.launch起動したら、下記ほどのトピックを登録します。
started core service [/rosout] process[zed/zed_wrapper_node-2]: started with pid [22058] process[zed/zed_state_publisher-3]: started with pid [22059] [ INFO] [1534228834.89329]: Initializing nodelet with 8 worker threads. [ INFO] [1534228834.92032]: pose_frame -> map [ INFO] [1534228834.92035]: odometry_frame -> odom [ INFO] [1534228834.92036]: base_frame -> zed_camera_center [ INFO] [1534228834.92037]: imu_link -> imu_link [ INFO] [1534228834.92038]: left_camera_frame -> zed_left_camera_frame [ INFO] [1534228834.92039]: left_camera_optical_frame -> zed_left_camera_optical_frame [ INFO] [1534228834.92040]: right_camera_frame -> zed_right_camera_frame [ INFO] [1534228834.92041]: right_camera_optical_frame -> zed_right_camera_optical_frame [ INFO] [1534228834.92042]: depth_frame -> zed_left_camera_frame [ INFO] [1534228834.92043]: depth_optical_frame -> zed_left_camera_optical_frame [ INFO] [1534228834.92044]: disparity_frame -> zed_left_camera_frame [ INFO] [1534228834.92046]: disparity_optical_frame -> zed_left_camera_optical_frame [ INFO] [1534228834.92047]: Publish map [TRUE] [ INFO] [1534228834.92048]: Camera Flip [FALSE] [ INFO] [1534228834.93286]: SDK version : 2.5.1 [ INFO] [1534228834.93288]: Camera coordinate system : COORDINATE_SYSTEM_RIGHT_HANDED_Z_UP_X_FWD ZED (Init) >> Depth mode: PERFORMANCE ZED (Init) >> Video mode: HD720@30 [ INFO] [1534228835.66989]: SUCCESS [ INFO] [1534228837.67012]: CAMERA MODEL : ZED [ INFO] [1534228837.74820]: Advertized on topic rgb/image_rect_color [ INFO] [1534228837.77489]: Advertized on topic rgb/image_raw_color [ INFO] [1534228837.79928]: Advertized on topic left/image_rect_color [ INFO] [1534228837.82335]: Advertized on topic left/image_raw_color [ INFO] [1534228837.83771]: Advertized on topic right/image_rect_color [ INFO] [1534228837.85071]: Advertized on topic right/image_raw_color [ INFO] [1534228837.87128]: Advertized on topic depth/depth_registered [ INFO] [1534228837.88400]: Advertized on topic confidence/confidence_image [ INFO] [1534228837.88453]: Advertized on topic confidence/confidence_map [ INFO] [1534228837.88510]: Advertized on topic disparity/disparity_image [ INFO] [1534228837.88579]: Advertized on topic point_cloud/cloud_registered [ INFO] [1534228837.88640]: Advertized on topic rgb/camera_info [ INFO] [1534228837.88691]: Advertized on topic left/camera_info [ INFO] [1534228837.88740]: Advertized on topic right/camera_info [ INFO] [1534228837.88792]: Advertized on topic depth/camera_info [ INFO] [1534228837.88843]: Advertized on topic rgb/camera_info_raw [ INFO] [1534228837.88895]: Advertized on topic left/camera_info_raw [ INFO] [1534228837.88950]: Advertized on topic right/camera_info_raw [ INFO] [1534228837.89008]: Advertized on topic map [ INFO] [1534228837.89071]: Advertized on topic odom -
2. rtabmapで3Dマップをビルドして保存します。
RTAB-MapはROSにあるデータからアルゴリズムを使って3Dマップを作成し、保存します。
下記はRTAB-Map実行のコマンドです:
$ roslaunch rtabmap_ros rtabmap.launch rtabmap_args:="--delete_db_on_start" depth_topic:=/camera/depth/depth_registered frame_id:=zed_center approx_sync:=false visual_odometry:=false odom_topic:=/camera/odom
RTAB-Mapで処理した3Dマップファイルのサンプル(ファイルはMeshlabアプリで開くことができます。)
-
3. 3Dマップを表示
保存した3Dマップファイルを読み込みます。Windowsでの表示にはPCLとQTを用います。
PCLViewer::PCLViewer (QWidget *parent) : QMainWindow (parent), ui (new Ui::PCLViewer) { ui->setupUi (this); this->setWindowTitle ("PCL viewer"); // Setup the cloud pointer cloud.reset (new PointCloudT); pcl::io::loadPLYFile("../src/cloud4.ply", *cloud); // Set up the QVTK window viewer.reset (new pcl::visualization::PCLVisualizer ("viewer", false)); ui->qvtkWidget->SetRenderWindow (viewer->getRenderWindow ()); viewer->setupInteractor (ui->qvtkWidget->GetInteractor (), ui->qvtkWidget->GetRenderWindow ()); ui->qvtkWidget->update (); connect (ui->pushButton_random, SIGNAL (clicked ()), this, SLOT (randomButtonPressed ())); connect (ui->horizontalSlider_p, SIGNAL (valueChanged (int)), this, SLOT (pSliderValueChanged (int))); connect (ui->distanceButton, SIGNAL (clicked ()), this, SLOT (distanceButtonPressed ())); connect (ui->circuitButton, SIGNAL (clicked ()), this, SLOT (circuitButtonPressed ())); connect (ui->areaButton, SIGNAL (clicked ()), this, SLOT (areaButtonPressed ())); connect (ui->volumeButton, SIGNAL (clicked ()), this, SLOT (volumeButtonPressed ())); connect (ui->resetButton, SIGNAL (clicked ()), this, SLOT (resetButtonPressed ())); viewer->addPointCloud (cloud, "cloud"); viewer->registerPointPickingCallback(pp_callback); pSliderValueChanged (2); viewer->resetCamera (); ui->qvtkWidget->update (); } -
5. サイズを計算する
3Dデータから指定したポイント2つの距離、四角に囲った範囲の周囲の長さと面積、立体(Cube)で囲んだ範囲の体積などが計算できます。
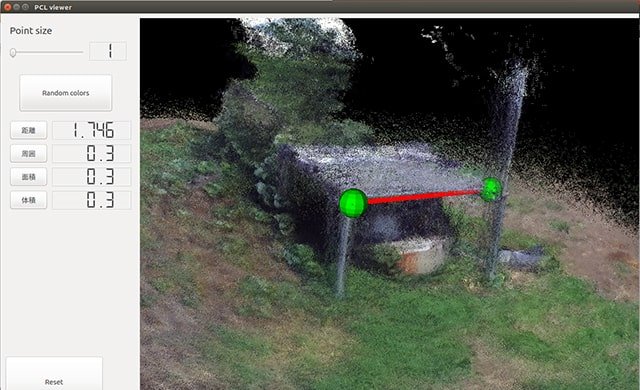
ポイント2つの距離:
  void PCLViewer::distanceButtonPressed ()
  {
    printf ("distance button was pressed\n");
    if (clicked_points.size() != 2) {
      ui->message->setText("click 2 points to get distance");
      return;
    } else {
      ui->message->setText("");
    }

    char str_line[512];
    sprintf(str_line, "line#%03d", PCLViewer::text_id - 1);

    viewer->addLine(clicked_points[0], clicked_points[1], str_line);
    viewer->setShapeRenderingProperties (pcl::visualization::PCL_VISUALIZER_LINE_WIDTH, 20, str_line);
    viewer->setShapeRenderingProperties (pcl::visualization::PCL_VISUALIZER_COLOR, 1, 0, 0, str_line);

    float x = pcl::geometry::distance(clicked_points[0].getArray3fMap(), clicked_points[1].getArray3fMap());
    ui->distanceLabel->display(x);
    ui->qvtkWidget->update ();
  }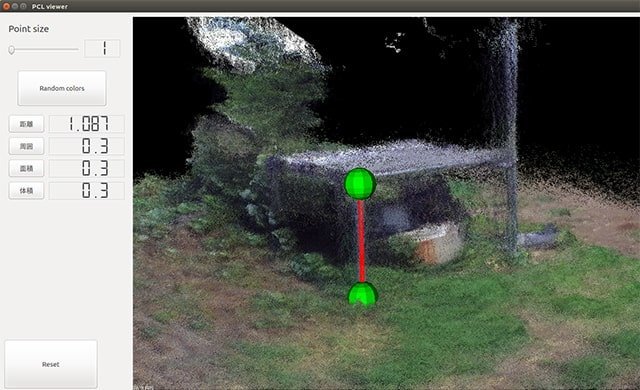
距離測定
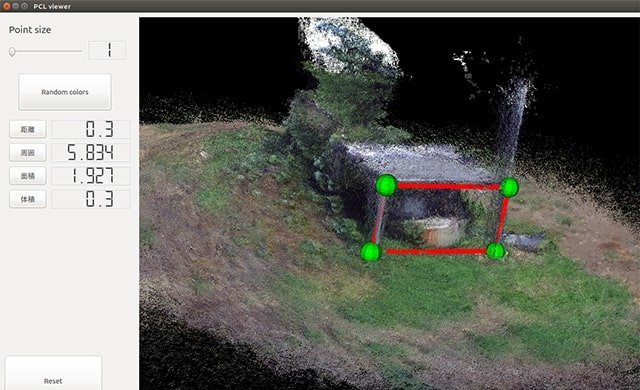
周囲と面積測定
Cube体積(ポイント選択順番は固定):
  void PCLViewer::volumeButtonPressed ()
  {
    printf ("area button was pressed\n");
    if (clicked_points.size() != 4) {
      ui->message->setText("click 4 points (triangle on downside and 1 point on upside with order: A->B->D->A2') to get volume");
      return;
    } else {
      ui->message->setText("");
    }

    Eigen::Vector3f point_A = clicked_points[0].getArray3fMap();
    Eigen::Vector3f point_B = clicked_points[1].getArray3fMap();
    Eigen::Vector3f point_D = clicked_points[2].getArray3fMap();
    Eigen::Vector3f point_A2 = clicked_points[3].getArray3fMap();
    Eigen::Vector3f point_C = point_B + point_D - point_A;
    Eigen::Vector3f point_B2 = point_B + point_A2 - point_A;
    Eigen::Vector3f point_D2 = point_D + point_A2 - point_A;
    Eigen::Vector3f point_C2 = point_C + point_A2 - point_A;

    viewer->addSphere(vector3f_to_pointxyz(point_C), 0.05, 1.0, 0.0, 0.0, "point_C");
    viewer->addSphere(vector3f_to_pointxyz(point_B2), 0.05, 1.0, 0.0, 0.0, "point_B2");
    viewer->addSphere(vector3f_to_pointxyz(point_C2), 0.05, 1.0, 0.0, 0.0, "point_C2");
    viewer->addSphere(vector3f_to_pointxyz(point_D2), 0.05, 1.0, 0.0, 0.0, "point_D2");

    Eigen::Vector3f line_AB = point_B - point_A;
    Eigen::Vector3f line_AD = point_D - point_A;
    Eigen::Vector3f line_AA2 = point_A2 - point_A;

    Eigen::Vector3f cross_AB_AD = line_AB.cross(line_AD);
    float s = cross_AB_AD.dot(line_AA2);

    ui->volumeLabel->display(s);
    ui->qvtkWidget->update ();
  }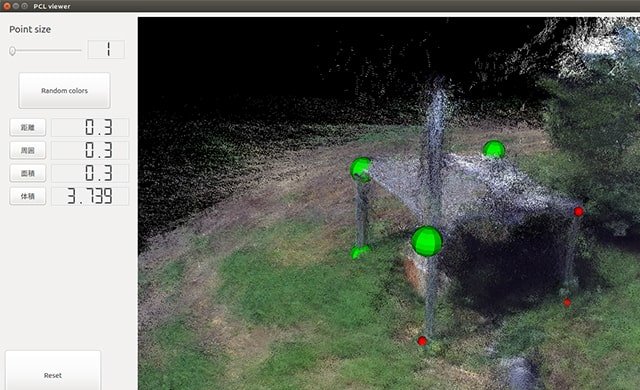
体積測定
IV.計測精度、まとめ
それでは、ZEDで計測した数値と実際にメジャーで測った数値を比較してみます。
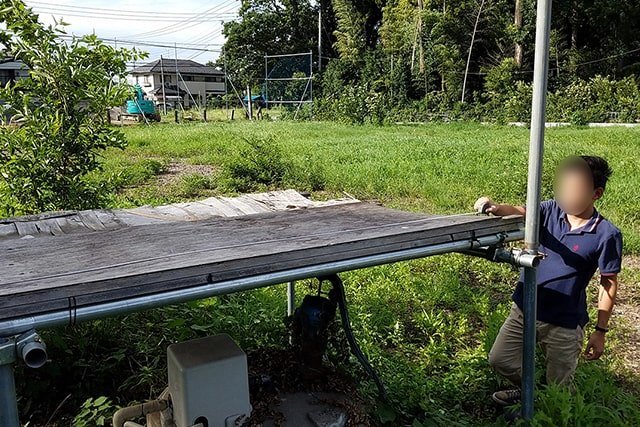
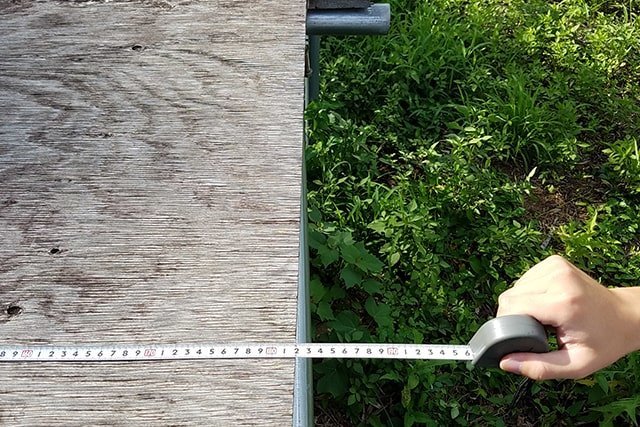
誤差は約7cmほどとなりました。
現在は3Dマップから対象物を取り出すステップを進めているので、改めて報告します。
さいごに
今回は弊社にて開発した事例のごく一部を紹介いたしました。
弊社はシステム開発を会社として、パッケージソフトの販売ではなくお客様のニーズに合わせた”受託開発”を専門としています。本記事に記載された技術に関するご質問や、利活用のご相談などがございましたらお気軽にお問い合わせください。